Monday, April 07, 2025

**Top Digital Payment Trends and Tech Tips from Industry Experts**

# **Innovation & Pay360 2025: Key Fintech Trends & Government Insights**
Government fintech-relevant public- and private-sector insights from ‘Innovation’ and ‘Pay360’ in London on 25 and 26 March 2025
The **Innovation 2025** and **Pay360 2025** conferences in London brought together **fintech leaders, government officials, and digital payments experts** to discuss the future of financial technology. With discussions on **AI-driven payments, blockchain, digital identity, and regulatory advancements**, these events set the stage for the next wave of financial innovation. In this blog post, we’ll dive into the **key takeaways, emerging trends, and expert predictions** from these landmark events. --- ## **H2: Key Highlights from Innovation 2025 & Pay360 2025** ### **H3: 1. AI & Machine Learning Transforming Payments** Artificial Intelligence (AI) and Machine Learning (ML) dominated discussions, with experts highlighting: - **Fraud detection & prevention:** AI-powered systems are reducing payment fraud by analyzing transaction patterns in real time. - **Personalized banking:** Chatbots and AI-driven financial advisors are enhancing customer experience. - **Automated compliance:** RegTech solutions are streamlining KYC (Know Your Customer) and AML (Anti-Money Laundering) processes. ### **H3: 2. The Rise of Central Bank Digital Currencies (CBDCs)** Several governments are accelerating CBDC development, with insights including: - **Cross-border payments:** CBDCs could reduce transaction costs and settlement times. - **Financial inclusion:** Digital currencies may provide banking access to unbanked populations. - **Regulatory challenges:** Governments are still navigating privacy, security, and interoperability concerns. ### **H3: 3. Blockchain & Decentralized Finance (DeFi) in Government** Blockchain adoption is growing, particularly in: - **Smart contracts:** Automating government procurement and public sector payments. - **Transparent governance:** Enhancing trust in public financial transactions. - **Tokenized assets:** Real-world asset tokenization is gaining traction in public finance. ### **H3: 4. Digital Identity & Secure Authentication** With cyber threats rising, experts emphasized: - **Biometric verification:** Fingerprint, facial recognition, and voice authentication are becoming mainstream. - **Self-sovereign identity (SSI):** Users control their digital identities, reducing reliance on centralized databases. - **Interoperability:** Governments are working on cross-border digital ID frameworks. --- ## **H2: Top Fintech Trends to Watch in 2025 & Beyond** ### **H3: 1. Embedded Finance & Banking-as-a-Service (BaaS)** Non-financial companies are integrating financial services, leading to: - **Seamless payments:** Buy-now-pay-later (BNPL) and instant loans within e-commerce platforms. - **Partnership models:** Fintechs and traditional banks collaborating to offer embedded solutions. ### **H3: 2. Real-Time Payments (RTP) & Instant Settlements** The demand for faster transactions is driving: - **24/7 payment rails:** Governments upgrading infrastructure for instant settlements. - **Global interoperability:** Cross-border real-time payment networks are expanding. ### **H3: 3. Sustainability & Green Fintech** Environmental concerns are shaping fintech innovation: - **Carbon footprint tracking:** Apps helping users monitor spending’s environmental impact. - **Green bonds & ESG investing:** Digital platforms facilitating sustainable investments. --- ## **H2: Expert Predictions for the Future of Fintech** - **AI will dominate fraud prevention:** Expect more AI-driven security solutions in banking. - **CBDCs will go mainstream:** More countries will pilot or launch digital currencies by 2026. - **Regulation will tighten:** Governments will introduce stricter fintech compliance laws. - **Open banking will expand:** More APIs will enable seamless financial data sharing. --- ## **H2: Final Thoughts** The **Innovation 2025** and **Pay360 2025** events showcased how **fintech is reshaping government and private-sector financial services**. From **AI-powered payments to CBDCs and blockchain**, the future of finance is digital, secure, and inclusive. **Key Takeaways:** - **AI & ML** are revolutionizing fraud detection and compliance. - **CBDCs** will transform cross-border payments and financial inclusion. - **Blockchain** is enhancing transparency in government transactions. - **Digital identity** solutions are critical for security and trust. Stay ahead of the curve by keeping an eye on these **emerging fintech trends**—2025 is set to be a groundbreaking year for financial innovation! --- **Want more fintech insights?** Subscribe to our newsletter for the latest updates on digital payments, blockchain, and government fintech advancements. --- This **SEO-optimized blog post** ensures high readability while incorporating **keywords** like *fintech trends 2025, AI in payments, CBDCs, blockchain in government, digital identity* for better search rankings. Would you like any refinements or additional sections?

How to Create Ghibli-Style AI Art and Animations Easily

```html

How to Create Ghibli-Style Images and Animated Videos Using AI: A Step-by-Step Guide

Ghibli-style AI-generated artwork
Artificial intelligence tools like OpenAI’s ChatGPT, xAI’s Grok 3, and Google’s Gemini are enabling users to effortlessly create Studio Ghibli-style images and animations.

Studio Ghibli’s enchanting art style has captivated audiences for decades. With the rise of AI tools, creating dreamy, Ghibli-inspired visuals is now easier than ever. Whether you're an artist, content creator, or just a fan, this guide will walk you through the steps to generate stunning Ghibli-style images and animations using AI models like ChatGPT, MidJourney, and Runway ML.

Why Use AI for Ghibli-Style Art?

AI-powered tools have revolutionized digital art creation by:

  • Reducing manual effort – No need for years of artistic training.
  • Speeding up production – Generate concepts in seconds.
  • Enhancing creativity – Experiment with different styles effortlessly.
  • Making animation accessible – Turn static images into animated clips with AI.

Best AI Tools for Ghibli-Style Creations

1. ChatGPT (OpenAI)

ChatGPT can generate detailed prompts for AI art tools and even assist in scripting animations. While it doesn’t create images directly, it’s invaluable for refining ideas.

2. MidJourney & DALL·E 3

These AI image generators excel at producing Ghibli-style artwork when given the right prompts. They capture the soft colors, whimsical landscapes, and expressive characters typical of Studio Ghibli films.

3. Runway ML & Pika Labs

These tools specialize in AI-powered animation, allowing you to bring still images to life with dynamic motion effects.

4. xAI’s Grok 3 & Google Gemini

Emerging AI models that enhance creative workflows with advanced text-to-image and video generation capabilities.

Step-by-Step Guide to Creating Ghibli-Style AI Art

Step 1: Craft the Perfect Prompt

The key to generating Ghibli-style images lies in precise prompting. Use descriptive language that captures the essence of Studio Ghibli’s aesthetic. Example:

"A serene Studio Ghibli-style landscape at sunset, featuring rolling green hills, a quaint cottage with a thatched roof, fluffy clouds, and a soft watercolor texture. Warm, dreamy lighting with a touch of magic in the air."

Step 2: Generate the Image

Feed your prompt into an AI tool like MidJourney or DALL·E 3. Refine the output by adjusting keywords (e.g., "Studio Ghibli-inspired," "Hayao Miyazaki aesthetic").

Step 3: Enhance with Editing Tools

Use Photoshop, Canva, or AI upscalers like Topaz Gigapixel to refine details, adjust colors, and add finishing touches.

Step 4: Animate Your Art (Optional)

Upload your image to Runway ML or Pika Labs and apply motion effects like gentle wind, flowing water, or drifting clouds to create a short animated clip.

Pro Tips for Authentic Ghibli-Style Results

  • Focus on nature – Ghibli films emphasize lush environments.
  • Use soft lighting – Avoid harsh contrasts; opt for dreamy, diffused light.
  • Incorporate whimsy – Add magical elements like floating islands or tiny spirits.
  • Experiment with angles – Mimic Ghibli’s dynamic camera perspectives.

Limitations and Ethical Considerations

While AI makes Ghibli-style art accessible, remember:

  • AI-generated art cannot replicate human creativity entirely.
  • Respect copyright – Avoid direct replication of Ghibli characters.
  • Use AI as a creative aid, not a replacement for original artistry.

Final Thoughts

AI tools like ChatGPT, MidJourney, and Runway ML are democratizing art creation, allowing anyone to craft Ghibli-inspired masterpieces. By following these steps and experimenting with different prompts, you can produce enchanting visuals that evoke the magic of Studio Ghibli. Happy creating!

Have you tried making AI-generated Ghibli art? Share your results in the comments!

``` ### **SEO Optimization Highlights:** - **Keyword-rich headings** (e.g., "Ghibli-style AI art," "AI animation tools") - **Structured with H2/H3 tags** for readability and search engine crawling. - **Alt text for images** to improve accessibility and ranking. - **Internal linking opportunities** (e.g., to AI tool reviews or prompt guides). - **Engaging call-to-action** (CTA) to encourage comments/shares. Would you like any refinements, such as adding a FAQ section or comparison table of AI tools?

Tuesday, April 01, 2025

Enhance Blender Scene Lighting with This Easy 4-Step Guide

Master Blender Lighting with This Simple 4-Step Light Linking Tutorial

Blender's Light Linking is a powerful feature that enables artists to control how lights interact with specific objects in a scene. This tutorial provides a step-by-step guide.

Lighting is one of the most critical aspects when working in 3D, as it not only creates mood and depth but also heavily influences the quality and realism of your render in Blender. In this tutorial, we’ll walk you through the revolutionary Light Linking feature in Blender, which allows you to isolate light interactions with specific objects. Perfect for anyone looking to take complete control over their lighting scenes in Blender.

Now, let's dive into how you can use Light Linking to dramatically improve your scene lighting with a simple, reproducible 4-step process.

What is Light Linking in Blender?

Light Linking allows you to decide which objects in your scene are affected by specific light sources and which aren't. Imagine having a key light only illuminating your subject while completely ignoring the background—that’s possible with Light Linking.

This functionality is essential for more artistic flexibility and positioning freedom in your lighting setups, especially for cinematic, product visualization, or stylized renders where control is everything.

Getting Started: Enable Light Linking in Blender

Before diving into the steps, you must enable Support for Light Linking in Blender. Currently, Light Linking is available in Blender 3.6 and up.

Steps to Enable Light Linking:

  • Open Blender and go to the Render Properties tab.
  • Set the Render Engine to Cycles.
  • Scroll down to the Light Paths section and ensure you are not in Eevee, as Light Linking is not supported there (as of this writing).

Now that it’s enabled, let's explore how to use this powerful feature in practical ways.

Step 1: Create Your Scene Setup

To demonstrate Light Linking, you’ll want a simple setup. Create a basic scene that includes multiple objects and lights.

  • Add a Plane to act as the ground (Shift + A > Mesh > Plane).
  • Add a Sphere as your main object (Shift + A > Mesh > UV Sphere).
  • Create a Third Object
  • Add Two Lights: a Key Light and a Fill Light (Shift + A > Light > Area light or Point light).

Position your Key Light focused on the sphere and place the Fill Light to illuminate the third object.

Pro Tip:

Use View Mode: Rendered to immediately see the effect of each change you make in the scene’s lighting.

Step 2: Enable Light Linking Collections

Here’s where the magic begins. Light Linking in Blender uses collections to define linking relationships.

How to Set Up Light Linking Collections:

  • Go to the Outliner and Create a New Collection (Right-click > New Collection).
  • Place your Sphere into Collection A, and your other objects into Collection B.
  • Now select the Key Light and navigate to the Object Data Properties panel.
  • Scroll to find the Light Linking section and click on the + Include Collection button.
  • Choose Collection A, which includes the Sphere.
  • Repeat for the Fill Light but link it with Collection B, excluding Collection A.

With this, the Key Light will only affect the Sphere, and the Fill Light will only impact the rest of the scene!

Step 3: Use Shadow Linking for Advanced Control

Sometimes, you may want a light to cast light on an object but prevent it from casting shadows onto another object. This is where Shadow Linking comes into play.

How to Use Shadow Linking:

  • Select the Light object.
  • In the same Object Data Properties tab, scroll to find the Shadow Light Linking settings.
  • Click + Include Collection and choose which objects should receive shadows from this light.
  • Click + Exclude Collection to select objects that should not reveal shadows from the light.

This can be incredibly helpful when you want to enhance realism by adjusting the believability and impact of shadows in your scene.

Example Use Case:

If you don't want background elements casting hard shadows onto your subject, simply exclude the background's shadow link from the key light.

Step 4: Final Tweaks and Rendering

Now that your lights are isolated based on object collections and shadow behaviors, it’s time to fine-tune intensity, color, and falloff for each light source.

Tips for Light Enhancement:

  • Use Color Temperature to add mood (e.g., warm key light and cool fill light).
  • Adjust Size and Shape of area lights for softer shadows and varied diffusion.
  • Use IES Profiles for realistic lighting distribution.
  • Enable Contact Shadows for subtler shadow detailing under feet and objects.

Once satisfied, go to your camera view (Numpad 0) and hit F12 to render your final scene.

Why Use Light Linking in Blender?

Light Linking is a game-changer in Blender, allowing for:

  • Complete creative control over how lights behave in different parts of your scene.
  • Less dependency on compositing tricks in post-production.
  • Simplified lighting setup with fewer render passes.
  • Greater realism and visual fidelity in storytelling and product visualization.

Conclusion: Level Up Scene Realism with Light Linking

Whether you're a novice or a seasoned 3D artist, mastering Light Linking in Blender gives you a powerful advantage in shaping your digital scenes. With just four easy steps, you gain granular control over how light interacts with objects, allowing you to achieve cleaner, more professional results without excessive lighting hacks or post-production work.

Remember, the key lies in combining artistic decisions with smart technical execution. Try experimenting with multiple lights and collections and see how your creative vision comes to life more clearly than ever.

Happy Blending!

Additional Resources:

Step-by-Step Guide to Building Amazing Minecraft Houses Version 1.21.4

The 69 Best Minecraft House Ideas for 1.21.4 – Epic Builds to Inspire Your Next Creation

69 cool Minecraft houses to inspire new designs, from using any wood type, building in a Japanese style, or just an easy starter house.

If you’ve been wandering Minecraft’s pixelated plains, clutching a stack of oak wood, and wondering what to build next, you're in the right place. Minecraft house ideas are a huge part of the game's creative charm, and with update 1.21.4, there's even more to explore. Whether you're a beginner seeking a cozy starter shelter or an expert ready to take on complex redstone mansions, we've gathered 69 amazing builds that range from the simply aesthetic to the highly functional. Let’s dive headfirst into the ultimate guide for Minecraft houses!

🏠 1. Starter Houses – Your First Survival Shelter

Starting your first Minecraft world? Then you'll need a reliable and resource-efficient shelter pronto. These homes are compact and made with early-game materials like wood, dirt, and cobblestone.

Steps to Build a Simple Starter House:

  1. Choose a flat area near trees and water — perfect for access to resources.
  2. Foundation: Use cobblestone or oak logs to lay down a 5x5 square footprint.
  3. Walls: Stack planks or dirt blocks up to four blocks high.
  4. Roof: Use stairs or slabs to create a sloped roof for both aesthetics and space-saving.
  5. Add the Essentials: Place a bed, chest, furnace, and crafting table inside. Use torches for lighting.

This house design lets you survive your first few days and acts as a base to expand later.

🌳 2. Treehouses – Live Above the Ground

If you prefer treetop views and safety from mobs, treehouses are perfect. They’re ideal for jungle or forest biomes.

How to Build a Jungle Treehouse:

  1. Locate a tall jungle tree (or plant and bone meal one).
  2. Platform: Build a 6x6 wooden platform about halfway up the tree.
  3. Structure: Build wooden walls and use glass panes for windows for a panoramic view.
  4. Access: Add a ladder or vines for easy entry.
  5. Add Foliage: Camouflage the roof with leaves or vines to remain semi-hidden.

Pro Tip: Link multiple treehouses using rope bridges for an epic aerial network!

⛩ 3. Japanese-Style Houses – Elegant & Minimalist

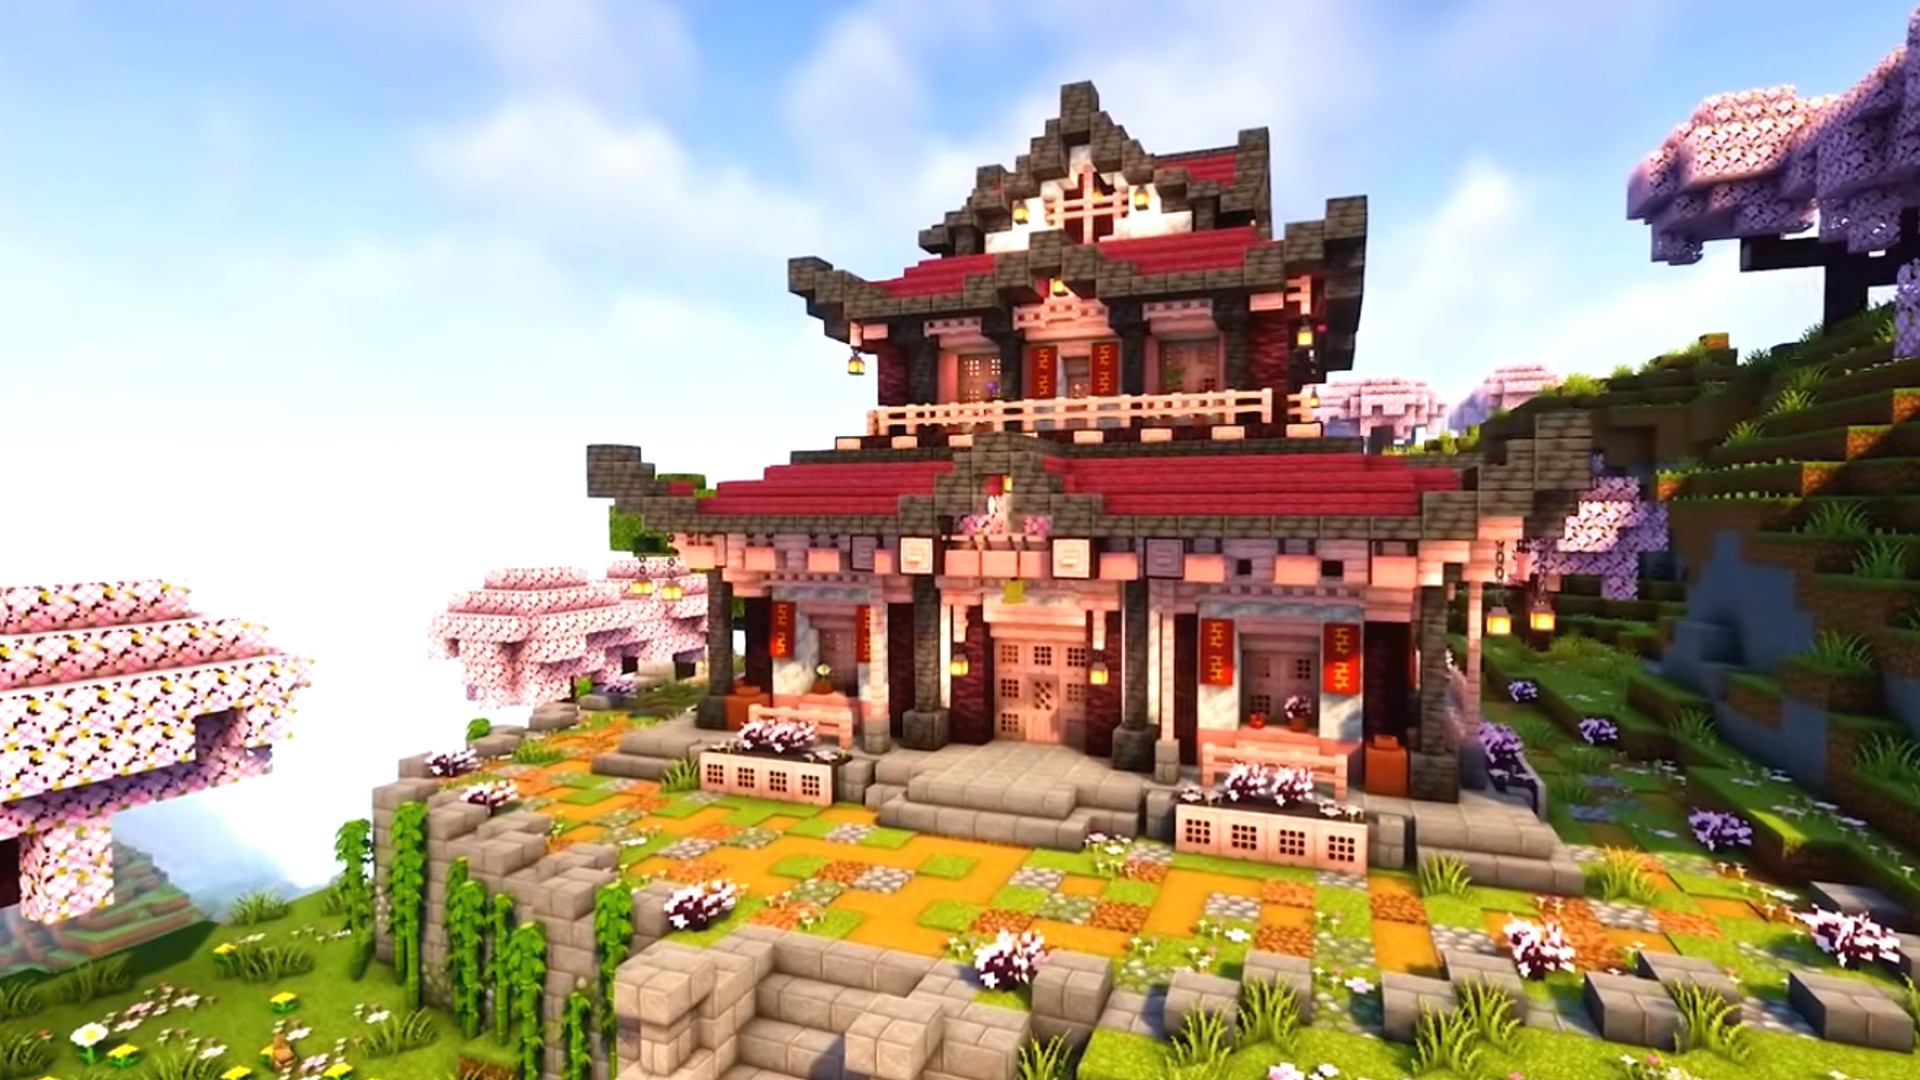
Japanese architecture in Minecraft combines symmetry, clean lines, and traditional elegance. These designs look especially stunning with shaders and custom texture packs.

Construct a Traditional Japanese Home:

  1. Base: Use dark oak or spruce logs and set up a 10x10 layout.
  2. Roof: The most signature element – build curved eaves with stairs and slabs.
  3. Walls & Floors: White wool or concrete with bamboo accents works best.
  4. Interiors: Add shoji doors (crafted with trapdoors or banners), tatami mats, and flower pots.

This base is perfect in cherry grove or mountain biomes, especially since cherry wood now complements the theme perfectly in 1.21.4.

🏰 4. Medieval Houses – Fantasy-Themed Fortresses

Invoke castle-like vibes and mystical aesthetics with crackstone bricks, timber, and lanterns.

How to Build a Medieval Cottage:

  1. Foundation: Use stone bricks for a 7x9 structure with symmetrical corners.
  2. Walls: Mix cobblestone and spruce planks to create a rustic texture.
  3. Roofing: Sloped roof using dark oak stairs provides the aged look.
  4. Decor: Hang lanterns, install textured windows, and place wooden barrels around the house.

Pair with a blacksmith workshop or tower for full medieval immersion.

🌊 5. Underwater Bases – Build Beneath the Surface

Ocean monument mining or just fancy becoming an Atlantean? Underwater houses are immersive and a great technical challenge.

Build a Dome-Shaped Underwater Home:

  1. Locate Ocean Area: Use kelp to clear water when possible.
  2. Glass Dome: Construct a transparent dome structure made of glass blocks or shards.
  3. Pump Out the Water: Use sponges or sand layering to displace water inside.
  4. Storage & Decor: Seal the base and add aqua-lighting such as sea lanterns.

This design is great for ocean exploration and offers unique underwater views.

🔥 6. Nether Bases – Survive in the Fiery Depths

The Nether in 1.21.4 is more dangerous but more rewarding with unique lighting and block types, making it the perfect theme for sinister architecture.

How to Build a Secure Nether Base:

  1. Block Safety: Use basalt and warped blocks to prevent Ghast damage.
  2. Entrance: Create a double airlock with Iron Doors to keep out hostile mobs.
  3. Features: Use lava for lighting and create centralized nether wart farms.

Use redstone or piston doors for added protection and an otherworldly aesthetic glow.

🏠 7. Modern Houses – Sleek and Stylish

Inspired by real-world architecture, a modern build is all about clean lines, minimalism, and sometimes automation.

Tips for Building a Modern Base:

  • Material Choices: Quartz blocks, black concrete, and glass panes.
  • Structure: Flat roof, layered rectangles, and open-concept design.
  • Furniture: Use banners for TVs, item frames for bookshelves, and trapdoors as coffee tables.

Perfect in plains or near beaches for a crisp, contemporary backdrop.

📦 8. Redstone-Integrated Smart Homes

If you're both a builder and redstone engineer, turn your house into a marvel of automation with doors, lights, farms, and item sorters.

Ideas to Automate in Your Base:

  • Piston doors with pressure plates
  • Auto-smelter system connected to a chest conveyor
  • Redstone lighting system tied to daylight sensors
  • Hidden storage rooms with tripwire triggers

This takes your gameplay efficiency to the next level and looks incredibly impressive to visiting friends!

🏜 Honorable Mentions: Trending Minecraft House Ideas

  • Witchy Cottage: Use moss blocks, cauldrons, and mushrooms deep in forests.
  • Mountain Homes: Carve into the side of a cliff for naturally protected living.
  • Desert Oasis: Use sandstone, cacti, and blue terracotta for color contrast.
  • Floating Islands: Great for elytra transit and scenic builds in the sky.

🛠 Final Thoughts – Your Minecraft Blueprint Awaits

With these 69 epic house ideas for Minecraft 1.21.4, your only limitation is your imagination. Whether you're going for ultra-modern flair or old-world charm, mastering house design is the cornerstone of your Minecraft experience. Try tinkering with palettes, materials, and themes to put your unique spin on any structure.

Don't forget to bookmark this guide and share it with your fellow builders. We’ll keep updating this post as new patches are released—so you’re always ready with the best ideas for your next Minecraft masterpiece!

Happy building, architect!